Jiggly Shark Pops Recipe- Fun Frozen Treat
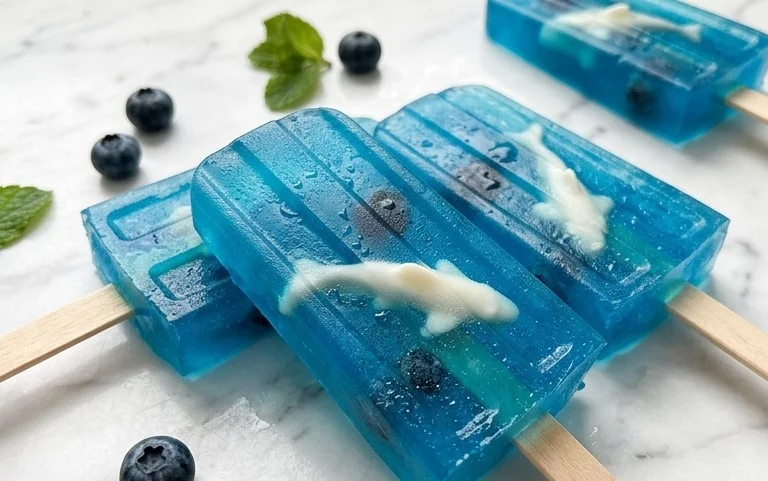
Get ready for a splash of fun with these incredibly delightful Jiggly Shark Pops! If you’re searching for a treat that’s as visually captivating as it is delicious, your quest ends here. These aren’t your average lollipops; they’re a miniature aquatic adventure waiting to happen, and they’re guaranteed to be a massive hit at any party or as a fun afternoon surprise. We all love a dessert that sparks joy and imagination, and these Jiggly Shark Pops certainly deliver. What makes them so special? It’s their irresistible wobbly texture that gives them that signature ‘jiggle,’ combined with their adorable shark shape and vibrant colors. They’re surprisingly simple to make, yet they possess that wow factor that will have everyone asking for the recipe. Prepare to dive into a world of sweet, jiggly goodness with these fantastic Jiggly Shark Pops – they’re truly a taste of the ocean’s magic!
Jiggly Shark Pops
Get ready for a splash of fun with these incredible Jiggly Shark Pops! These are not your average popsicles; they’re wobbly, jiggly, and absolutely bursting with fruity flavor. Perfect for a summer party, a fun afternoon treat, or just because you want to add a little whimsy to your day. The kids will go wild for these, and honestly, who can resist a fun, jiggly shark? Making them is surprisingly simple, and the results are so rewarding. We’ll transform a few basic ingredients into these delightful, toothsome treats that are sure to be a hit. So, let’s dive in and get our fins wet in the kitchen!
Ingredients:
- 2 cups fruit juice (such as grape or blue raspberry)
- 1 cup water
- 2 tablespoons gelatin powder
- 2 tablespoons sugar (optional, adjust to your sweetness preference)
- Shark candy or gummy sharks for decoration
- Popsicle sticks or molds
Let’s Get Jiggly: The Process
This recipe is all about creating that perfect jiggly texture that makes these pops so much fun. The secret is the gelatin, which sets the liquid into a delightful, wobbly state. We’re going to start by blooming our gelatin, which is a crucial step to ensure it dissolves smoothly and evenly without any lumps.
Blooming the Gelatin
In a small bowl, combine the 1 cup of water with the 2 tablespoons of gelatin powder. Give it a good stir. You’ll notice the gelatin will start to absorb the water and look like a spongy, thick paste. This is what we call “blooming.” Letting it sit for about 5 to 10 minutes allows the gelatin granules to fully hydrate. This step is super important because if you add gelatin powder directly to hot liquid, it can clump up. Blooming it first makes it much easier to work with and ensures a silky smooth final product.
Heating the Juice Base
Now, it’s time to prepare our flavorful base. Pour the 2 cups of fruit juice into a medium saucepan. If you’re using sugar for added sweetness, now is the time to stir it in. Gently heat the fruit juice over medium-low heat. You don’t want it to boil; we’re just looking to warm it up enough to dissolve the bloomed gelatin and sugar. Stir occasionally as it heats. The goal here is to get the juice warm, not hot. A gentle simmer is acceptable, but boiling can sometimes affect the gelatin’s setting power, so aim for just below a boil.
Melting the Gelatin into the Juice
Once the fruit juice is warm and the sugar (if used) is dissolved, it’s time to introduce our bloomed gelatin. Add the bloomed gelatin mixture to the warm fruit juice in the saucepan. Whisk continuously until the gelatin is completely dissolved and you can no longer see any granules or clumps. This should only take a minute or two. Keep whisking until the mixture is smooth and uniform. If you notice any small bits of gelatin remaining, you can continue to whisk gently over very low heat, but be careful not to overheat it. The liquid should be perfectly clear and free of any undissolved gelatin.
Cooling and Preparing for Molds
After the gelatin is fully dissolved, remove the saucepan from the heat. Let the mixture cool slightly for about 5-10 minutes. This is an important step to prevent the gelatin from setting too quickly in the molds and to avoid melting any candy decorations you might want to add. You want it warm enough to be pourable but not so hot that it will cook or distort your shark candies. If you’re using popsicle molds, this is the perfect time to get them ready. If you’re using popsicle sticks directly, make sure your molds are set up in a way that they will stand upright, perhaps in a container or muffin tin.
Assembling and Freezing the Jiggly Sharks
Now for the fun part: assembling our jiggly sharks! If you are using molds, pour the slightly cooled liquid into your popsicle molds, filling them about two-thirds of the way full. If you’re using popsicle sticks directly in a container, carefully pour the liquid into the container, leaving enough space at the top. Before the liquid fully sets, gently place your shark candy or gummy sharks into the liquid, positioning them so they look like they’re swimming. If you’re using popsicle sticks without molds, insert them into the liquid now, making sure they are centered. If the liquid has cooled too much and is starting to thicken, you can briefly warm it again over low heat. Once your sharks are in place and your sticks are inserted (if applicable), carefully transfer the molds or containers to the freezer.
The Waiting Game: Setting the Pops
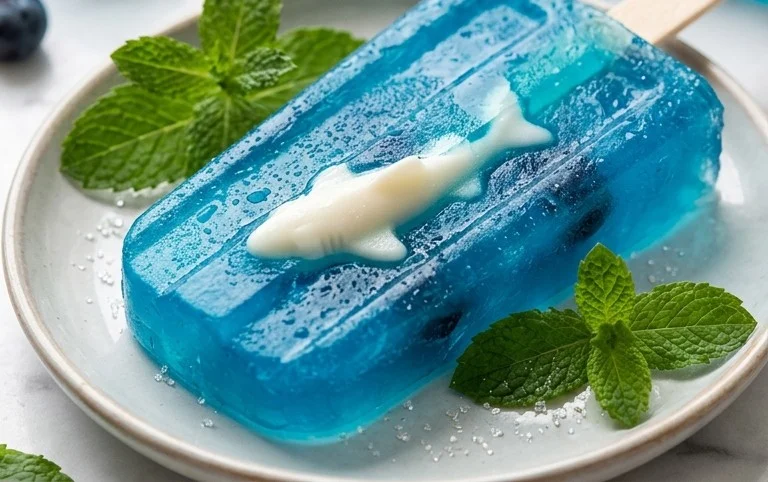
This is where patience comes in! Let your Jiggly Shark Pops freeze completely. This will typically take at least 4-6 hours, but overnight is even better to ensure they are firm and fully set. The jiggly texture will develop as they freeze. Once they are solid, you can carefully remove them from their molds. If they’re a little stubborn, you can run the outside of the mold under warm water for a few seconds to help release them. Place your Jiggly Shark Pops on a baking sheet lined with parchment paper and return them to the freezer for a little while longer to firm up completely before serving. This step helps prevent them from melting too quickly once they are out of the freezer. Enjoy your deliciously jiggly, shark-infested creations!
Conclusion:
There you have it – your ultimate guide to creating delightful Jiggly Shark Pops! This recipe is a fantastic choice for so many reasons. It’s incredibly fun and visually appealing, making it a guaranteed hit with kids and adults alike. The unique jiggly texture is undeniably satisfying, and the simple process ensures that even novice bakers can achieve impressive results. Whether you’re planning a summer pool party, a beach-themed birthday, or just looking for a unique treat to brighten your day, these shark pops are perfect.
These Jiggly Shark Pops are wonderfully versatile. Serve them chilled straight from the freezer for a refreshing dessert. They also make an excellent addition to a dessert table, adding a pop of fun color and a playful theme. Consider pairing them with other ocean-themed treats or simply enjoy them as a standalone delight. Feel free to get creative with your colors – maybe a pastel blue, a vibrant green, or even a fiery orange shark!
I truly encourage you to give this recipe a try! It’s a simple, rewarding experience that results in a truly memorable treat. Don’t be afraid to experiment with different flavor extracts or food coloring to personalize your shark creations. Get ready to impress your friends and family with these unique and delicious Jiggly Shark Pops!
Frequently Asked Questions:
Can I use different shapes besides sharks?
Absolutely! While the shark shape is iconic, feel free to use any fun silicone molds you have on hand. Starfish, dolphins, or even simple round molds will work beautifully. The jiggly texture will still be the star of the show!
How long do Jiggly Shark Pops last?
Properly stored in an airtight container in the freezer, Jiggly Shark Pops can last for up to 2-3 weeks. However, they are best enjoyed within the first week for optimal texture and flavor.
My jiggly pops aren’t firm enough. What did I do wrong?
This usually means the gelatin didn’t fully set. Ensure you are dissolving the gelatin completely in the hot liquid and that the mixture is chilled thoroughly before it goes into the molds. Overcrowding the freezer with too many items can also sometimes hinder proper freezing, so give them space!
Jiggly Shark Pops
Fun and wiggly fruity popsicles shaped like sharks, perfect for a playful treat. These jiggly delights are easy to make and a hit with kids.
Ingredients
-
2 cups fruit juice (such as grape or blue raspberry)
-
1 cup water
-
2 tablespoons gelatin powder
-
2 tablespoons sugar (optional)
-
Shark candy or gummy sharks for decoration
-
Popsicle sticks or molds
Instructions
-
Step 1
In a saucepan, combine the fruit juice and water. Heat gently over medium heat, but do not boil. -
Step 2
Sprinkle the gelatin powder over the warm liquid and whisk until completely dissolved. If using sugar, whisk it in now until dissolved. -
Step 3
Pour the mixture into popsicle molds or glasses. Leave enough space at the top for the gummy sharks. -
Step 4
Gently place a shark candy or gummy shark into each mold, pressing it slightly into the liquid if needed. -
Step 5
Insert popsicle sticks into the molds. -
Step 6
Refrigerate for at least 4-6 hours, or until completely set and jiggly. -
Step 7
To serve, briefly run the outside of the mold under warm water to release the popsicles.
Important Information
Nutrition Facts (Per Serving)
It is important to consider this information as approximate and not to use it as definitive health advice.
Allergy Information
Please check ingredients for potential allergens and consult a health professional if in doubt.
